Overview
What is a CA connector?
A Certificate Authority (CA) connector is a middleware plugin facilitating communication between the system and any third-party CA. The CA connector is responsible for authenticating, pulling available product (issuance) and import options, requesting and retrieving certificates from the client's chosen CA.
According to our architecture, every CA connector is a REST-based web service with certain predefined APIs implemented to perform a task. A CA connector framework is provided to help build more CA connectors easily to support the clients' ecosystem.
A CA connector is composed of three parts:
- An executable that is run within a container. The executable uses a web framework to receive incoming requests from a service within the VSatellite. The request is processed and the response is returned to the internal service which then sends the result to the cloud.
- A manifest that defines a series of data structures that are used during different operations.
- The manifest MUST define the properties required for connecting to the CA
- To support certificate issuance, the manifest MUST define the properties required for submitting a certificate request, as well as retrieving issued certificate and chain.
- To support importing certificates, the manifest MUST define properties specific to the import configuration and options needed for the retrieval of certificates from the CA's datastore.
- A container image that is compatible with the executable. It is strongly recommended that the image also contain the
manifest.jsonso that if a change to the manifest is made, but not to the executable code, then the container image SHA256 digest will also be changed.
What is a CA connector framework?
The CA connector framework provides the following:
- Step-by-step guidance
- An easy-to-use template
- A faster way to build and test a cloud CA connector
This framework makes it easy for developers to build a new CA connector in a few simple steps. It removes the complexities of execution or supportability within the cloud environment.
This CA connector framework gives the freedom and flexibility to define UI fields in the UI using JSON form components and the back-end as a REST web service. A simulation environment is provided to seamlessly validate the UI and end-to-end execution, allowing developers to focus on writing the back-end CA connector code without worrying about the complex execution model.
📘 Note
Although the CA connector framework is programming language agnostic, to work effectively you must have some working knowledge of the Go programming language.
How do I get started?
-
Set up your developer environment. You have options in this step, choose the one that fits your needs.
- Sample CA connector - Download and unzip the
sample-ca-connectortemplate. Here we will walk you through how to build and run a local sample CA connector. - DigiCert CA OpenSource - Clone our DigiCert connector. This option makes creating the manifest and the code much easier because this is a working pre-built, ready-to-go alternative that contains a manifest, source code, and makefile to construct a Docker image ready for uploading to a container registry. From that point, developers can update the manifest to incorporate the container registry path and use it in production. Note you will need a VSatellite accessible registry for this option.
- Sample CA connector - Download and unzip the
-
Design the UI (front-end). We will provide you with a default manifest editor. This environment allows you to develop and validate your data. We also provide you with a manifest reference, which allows you to customize your manifest to fit your needs.
-
Build CA connector code (back-end). Create the web-service back-end CA connector code using the files from the
sample-ca-connectortemplate. The two files you will use are:-
main.go - this file contains a declaration of the 7 APIs we will use.
-
handlers.go - this file contains the functions that implement these APIs. This is where we will define all the logic (e.g., how we connect to the CA server, how to request and retrieve certificate from the CA server, etc.).
-
-
Test E2E. Test end to end via the manifest editor and the VenProxy simulation utility. The VenProxy simulation utility creates the bridge from the simulation environment to your locally connected developer environment. This is where we will validate that your front-end UI on the manifest editor is connected via the VenProxy simulator to your back-end CA connector code.
Step 1: Set up your developer environment
For this walk-thru, we will provide you with a sample-ca-connector template that you can use to add your logic and customize it to fit your environment.
- Download and unzip the
sample-ca-connectortemplate.
Compile the sample-ca-connector template.
- Run the
buildcommand and then run thesample-ca-connector. That should start your connector on port 8080.
$ go build
go: downloading github.com/labstack/echo/v4 v4.11.3
go: downloading go.uber.org/zap v1.26.0
go: downloading golang.org/x/crypto v0.14.0
go: downloading golang.org/x/net v0.17.0
go: downloading github.com/mattn/go-isatty v0.0.20
go: downloading golang.org/x/text v0.14.0


$ ./sample-ca-connector
{"level":"info","time":"2023-11-10T15:35:18+02:00","caller":"sample-ca-connector/main.go:34","msg":"Sample Ca Connector Starting"}
{"level":"error","time":"2023-11-10T15:35:18+02:00","caller":"sample-ca-connector/main.go:99","msg":"payload encryption key not found or readable","error":"open /keys/payload-encryption-key.pem: no such file or directory","stacktrace":"main.addPayloadEncryptionMiddleware\n\t/Users/john.dev/playground/sample-ca-connector/main.go:77\nmain.main\n\t/Users/john.dev/playground/sample-ca-connector/main.go:44\nruntime.main\n\t/usr/local/go/src/runtime/proc.go:250"}

   ____    __
  / __/___/ /  ___
 / _// __/ _ \/ _ \
/___/\__/_//_/\___/ v4.11.1
High performance, minimalist Go web framework
https://echo.labstack.com
____________________________________O/_______
                                    O\
⇨ http server started on [::]:8080
C:\Users\john.dev\DevHub\sample-ca-connector> go build
go: downloading github.com/labstack/echo/v4 v4.11.3
go: downloading go.uber.org/zap v1.26.0
go: downloading golang.org/x/crypto v0.14.0
go: downloading golang.org/x/net v0.17.0
go: downloading github.com/mattn/go-isatty v0.0.20
go: downloading golang.org/x/text v0.14.0


C:\Users\john.dev\DevHub\sample-ca-connector> .\sample-ca-connector.exe
{"level":"info","time":"2023-11-10T17:07:32+02:00","caller":"sample-ca-connector/main.go:34","msg":"Sample Ca Connector Starting"}
{"level":"error","time":"2023-11-10T17:07:32+02:00","caller":"sample-ca-connector/main.go:99","msg":"payload encryption key not found or readable","error":"open /keys/payload-encryption-key.pem: The system cannot find the path specified.","stacktrace":"main.addPayloadEncryptionMiddleware\n\tC:/Users/john.dev/DevHub/sample-ca-connector/main.go:77\nmain.main\n\tC:/Users/john.dev/DevHub/sample-ca-connector/main.go:44\nruntime.main\n\tC:/Program Files/Go/src/runtime/proc.go:250"}

   ____    __
  / __/___/ /  ___
 / _// __/ _ \/ _ \
/___/\__/_//_/\___/ v4.6.1
High performance, minimalist Go web framework
https://echo.labstack.com
____________________________________O/_______
                                    O\
⇨ http server started on [::]:8080
Step 2: Design the UI (front-end)
You will create the front-end UI using the manifest editor. As you build out your manifest, you can validate your data. See the below example:
📘 Note
You will notice a "Login" button in the top right-hand corner. At this point, you do not need to sign in to start creating your manifest. Instead, you can begin to create your manifest, reset it if necessary, and edit it until you are happy with it. However, you must log in with your credentials when you are ready for end-to-end testing in step four.
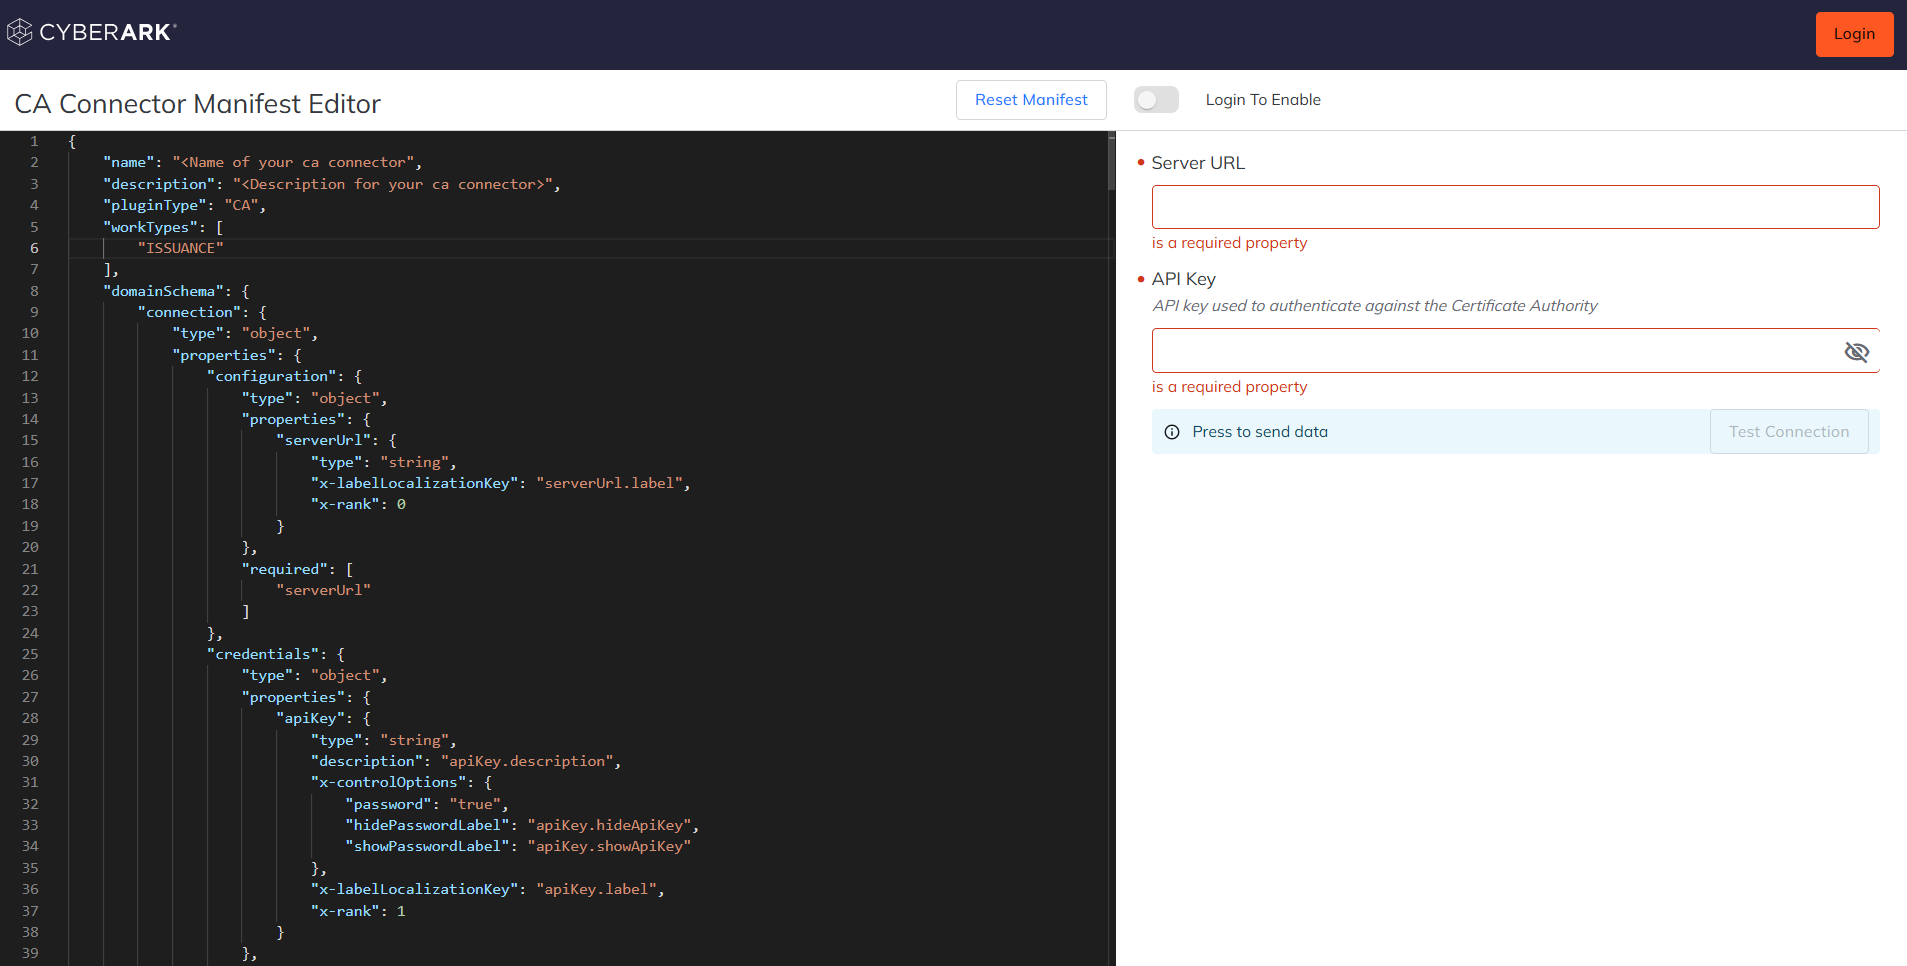
- Build out your manifest using the JSON form. This manifest will dictate how your front-end UI will look. Use the left pane to change anything needed for your specific environment, and the results will be dynamically populated in the right pane of the editor. You can use the manifest reference to customize the UI based on your specific needs.
✅ Tip
If you make a mistake and want to start over, click the button on the top of the screen, "RESET MANIFEST."
🚧 Warning
Once you are happy with your UI, remember to make a copy and save it locally. Your session will not be saved on the manifest editor.
Step 3: Build CA connector code (back-end)
- Create your web-service back-end CA connector code using the files from the
sample-ca-connectortemplate. There you will find two files (main.go and handlers.go).
The main.go file contains a declaration of several APIs we will be using:
ℹ️ APIs
/v1/testconnection- This API takes the connection details and responds back with a successful or failure connection to the Certificate Authority we are building a connection for./v1/getoptions- This API takes the connection details and responds back with product (issuance) options available on the CA. If no product (issuance) options exist on the CA, a default one should be returned using a predefined "Default Product" name./v1/validateproduct- This API takes the connection details, name, and product details and responds with error details if validating against the Certificate Authority is unsuccessful or empty errors otherwise./v1/requestcertificate- This API takes the connection details, validity seconds, name of the product option, specified product, and PKCS #10 certificate request and responds back with order and/or certificate details./v1/checkorder- This API takes the connection details and specific order id and responds back with current order details./v1/checkcertificate- This API takes the connection details and specific certificate id and responds back with current certificate details./v1/importcertificates- This API takes the connection details, import option, import configuration, last processed certificate ID, and batch size as inputs. In return, it provides the import status, the last certificate identifier for the current batch, and a list of certificates, including issuer certificates./v1/revokecertificate- This API takes the connection details, certificate revocation data, revocation reason, and responds with the revocation status and an error message if the revocation fails./v1/getvalidationpolicy- This API takes the connection details and responds with the current CA validation policy, including name constraints for Common Name (CN) and DNS Subject Alternative Name (SAN) patterns. The handlers.go file is where we will define all the logic. Here, you will determine how we connect to the server, how to retrieve available product (issuance) options, validate specific product details, submit certificate requests, and check for order and certificate details. This file contains several functions where we will define the logic:
ℹ️ Functions
handleTestConnection- This is where you will write the logic to connect to the CA server.handleGetOptions- This is where you write the logic to retrieve product(issuance) from the CA server.handleValidateProduct- This is where you write the logic for validating the specific product(issuance) details.handleRequestCertificate- This is where you write the logic for submitting certificate requests to the CA server.handleCheckOrder- This is where you write the logic to get order details for the submitted certificate request.handleCheckCertificate- This is where you write the logic to get certificate details for the submitted certificate request.handleImportCertificates- This is where you write the logic to retrieve certificates available for import from the CA server.handleRevokeCertificate- This is where you write the logic to submit a certificate revocation request to the CA server.handleGetValidationPolicy- This is where you write the logic to retrieve the current CA validation policy.
Step 4: Test E2E
Once you complete your front-end UI manifest and back-end CA connector code, you are ready to validate with end-to-end testing.
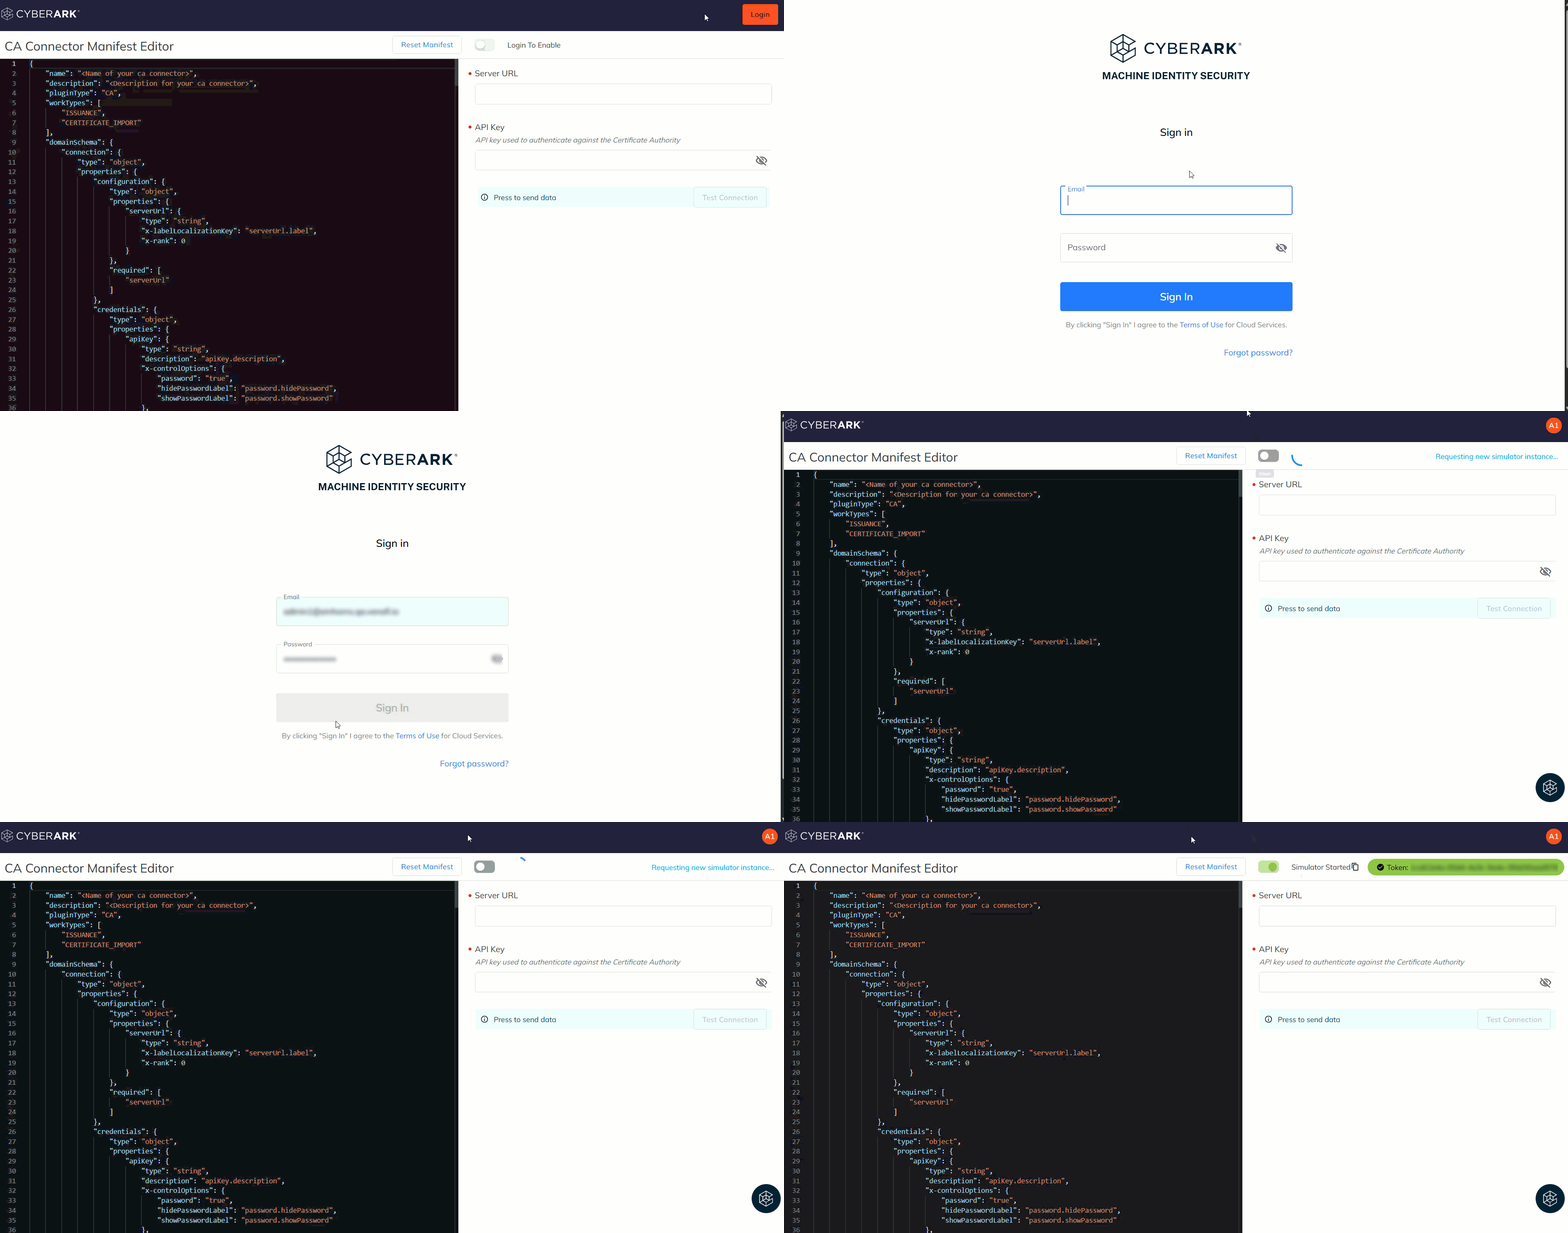
- In the manifest editor, click the login button and enter your credentials. Now, toggle the simulator button, and this will create a unique simulator session token ID and create a dedicated back-end simulator. Copy this token ID and save it for later.
-
Download and unzip the VenProxy simulation utility. VenProxy creates the bridge from the simulation environment to your locally connected developer environment.
-
Run the VenProxy simulation utility and enter your token ID saved from the previous step when prompted. The simulator should now be connected to your local environment. To verify, go back to your VenProxy, and you will see that the front-end UI is connected to VenProxy and is talking to the web server on port 8080.
 $ ./VenProxy
Enter the simulation session token:
e92336ac-f37b-4077-9010-e82b3a6f1ae3
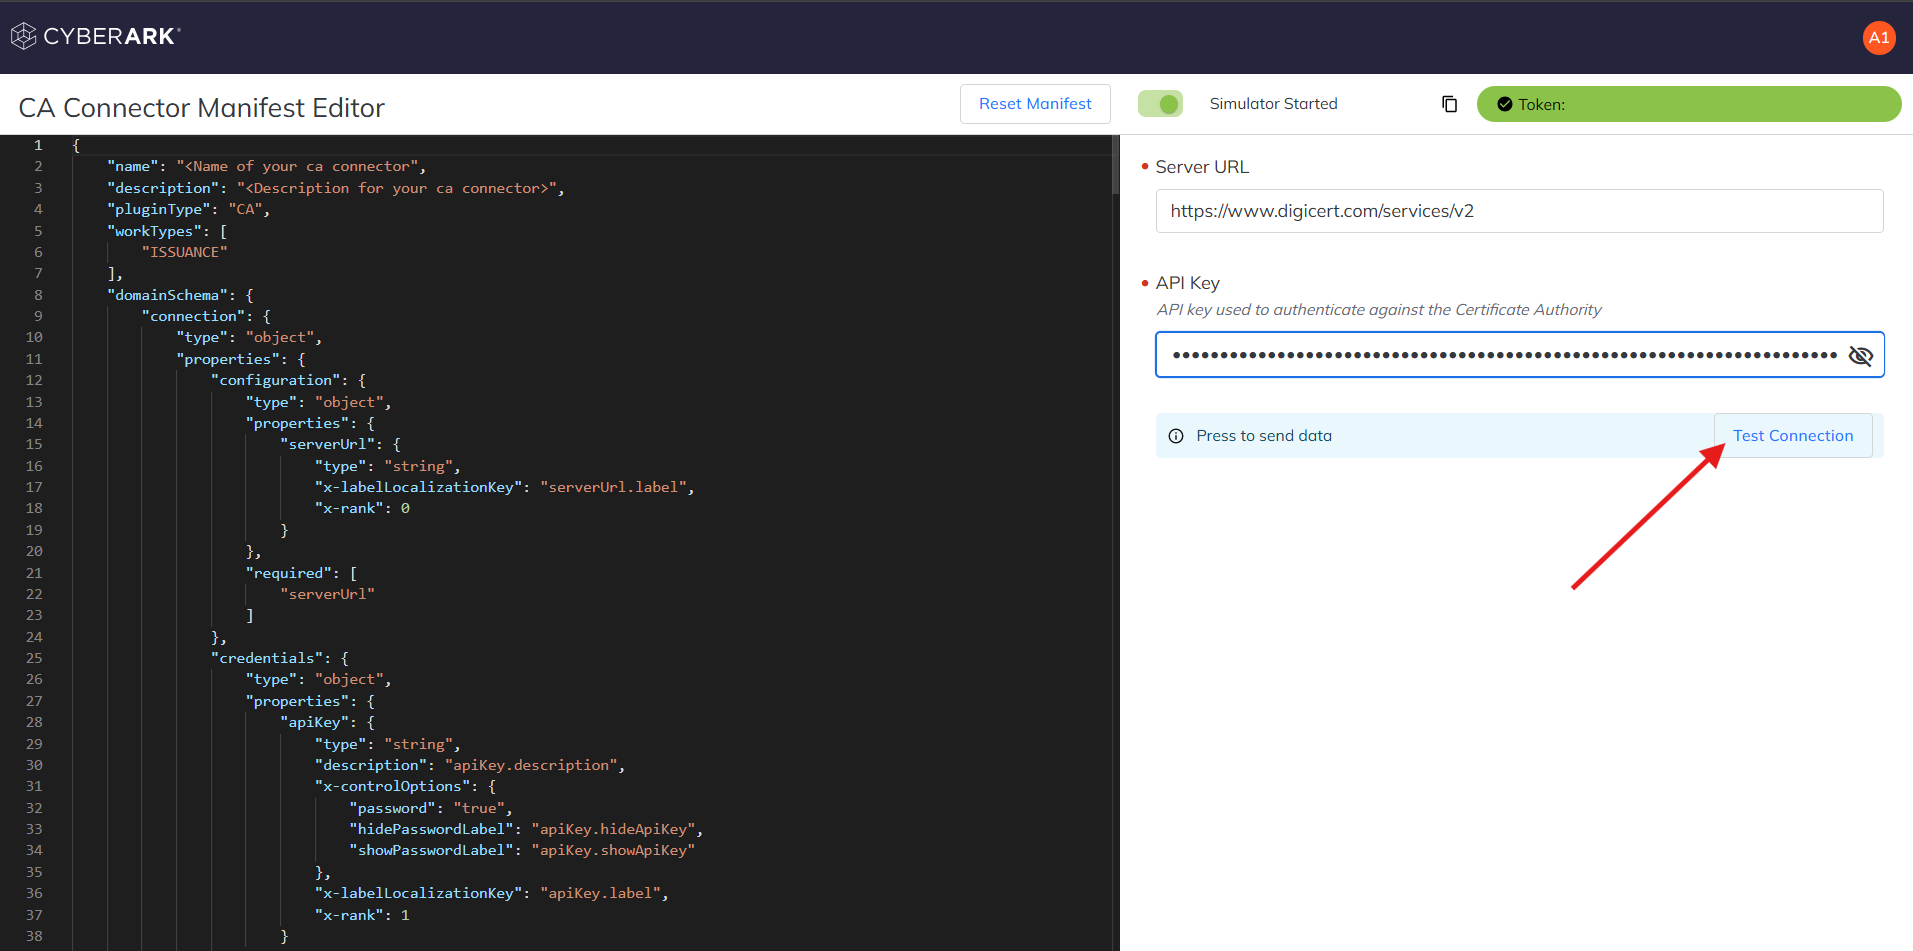
- Go back to the manifest editor and test the connection. Fill out the required fields and click on the “Test Connection” button. You should see a successful connection noted by the “true“ response below.
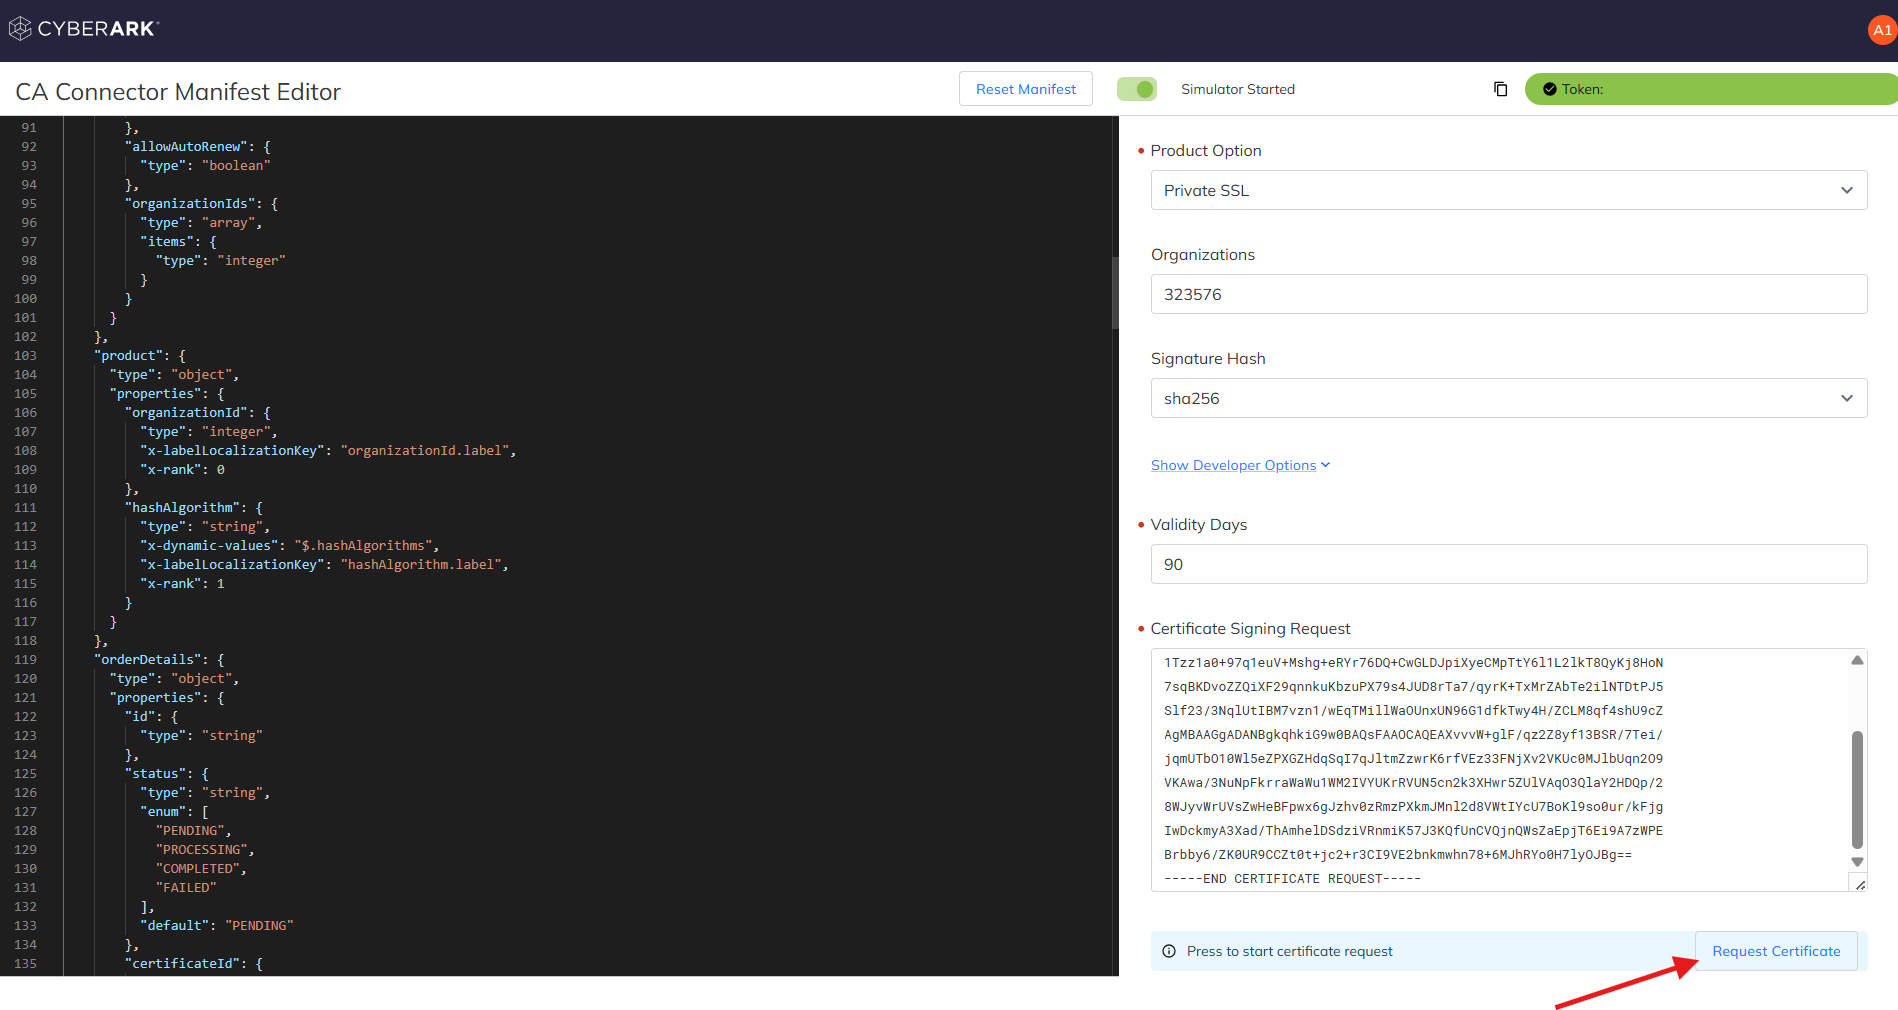
- Request your first certificate. At this point, you can now request certificates. Fill out the required fields and click the "Request Certificate" button. You should see a successfully issued certificate for the submitted certificate request or an error that prevents the certificate issuance.
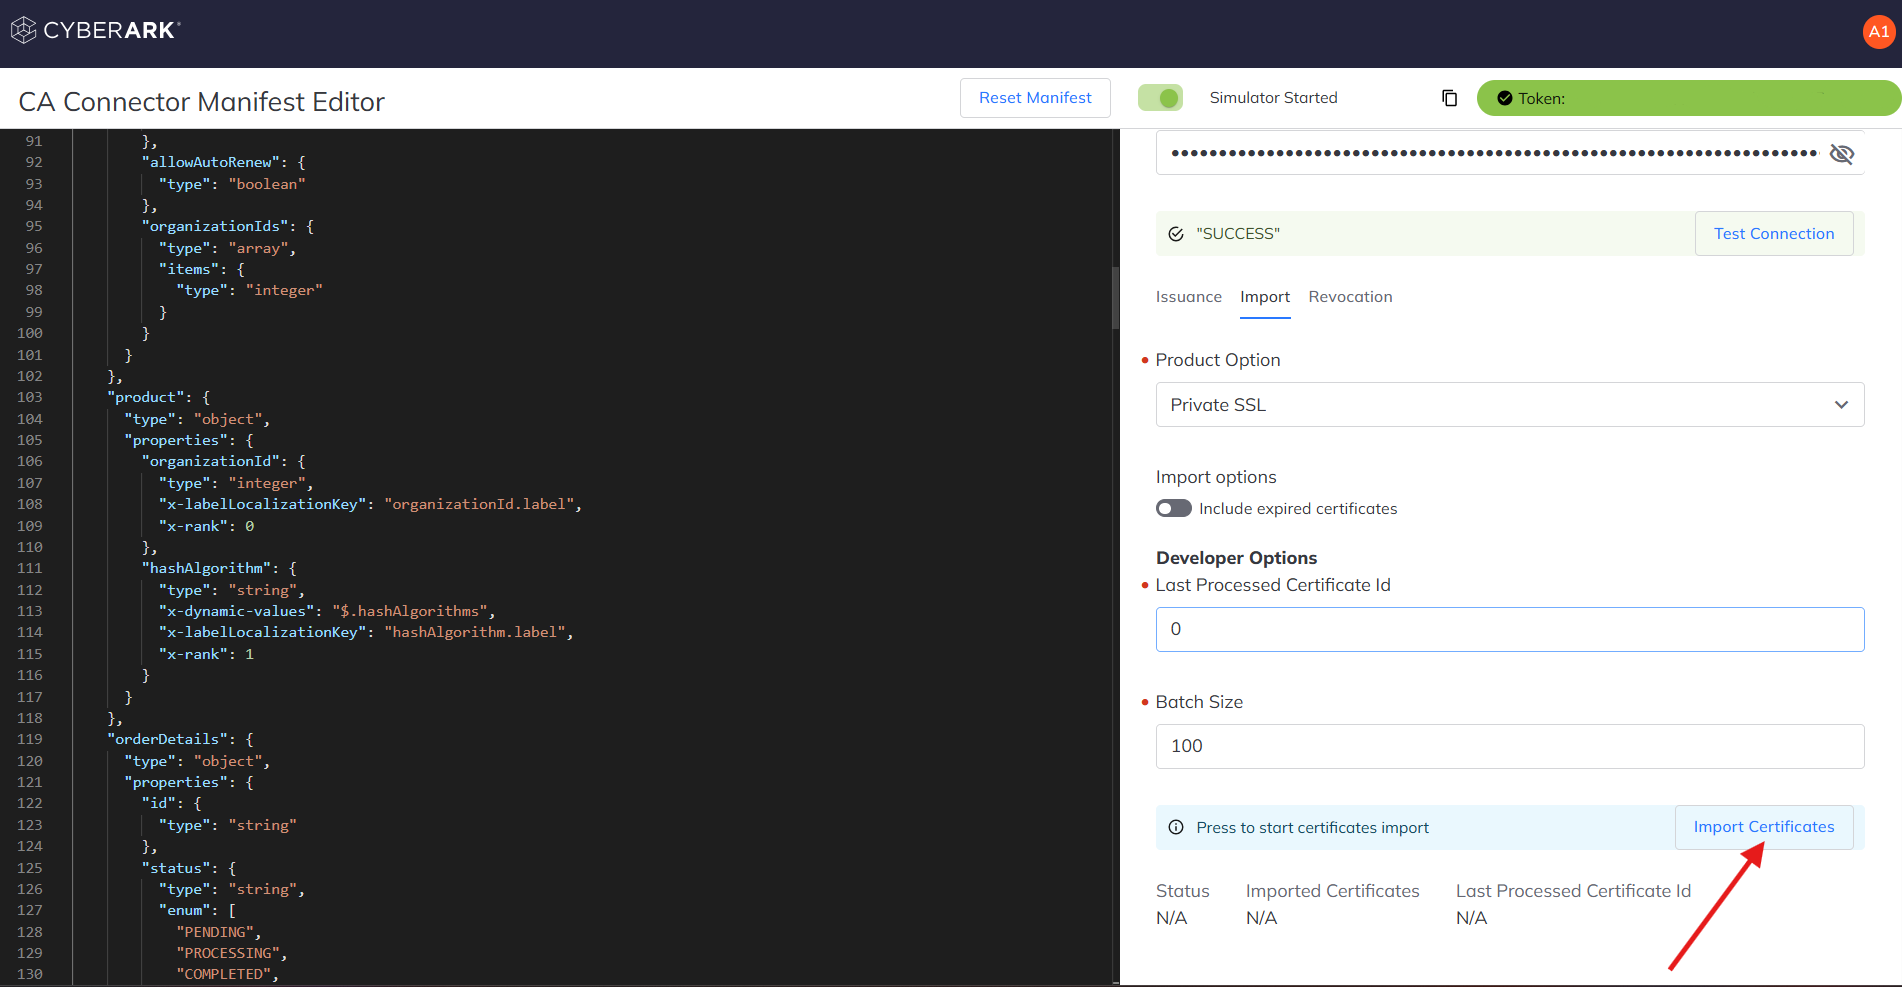
- Import your certificates. In addition to the issuance capability, retrieving certificates applicable for import is also possible. Fill out the required fields and click the "Import Certificates" button. You should see a successfully issued certificate for the submitted certificate request or an error that prevents the certificate issuance.
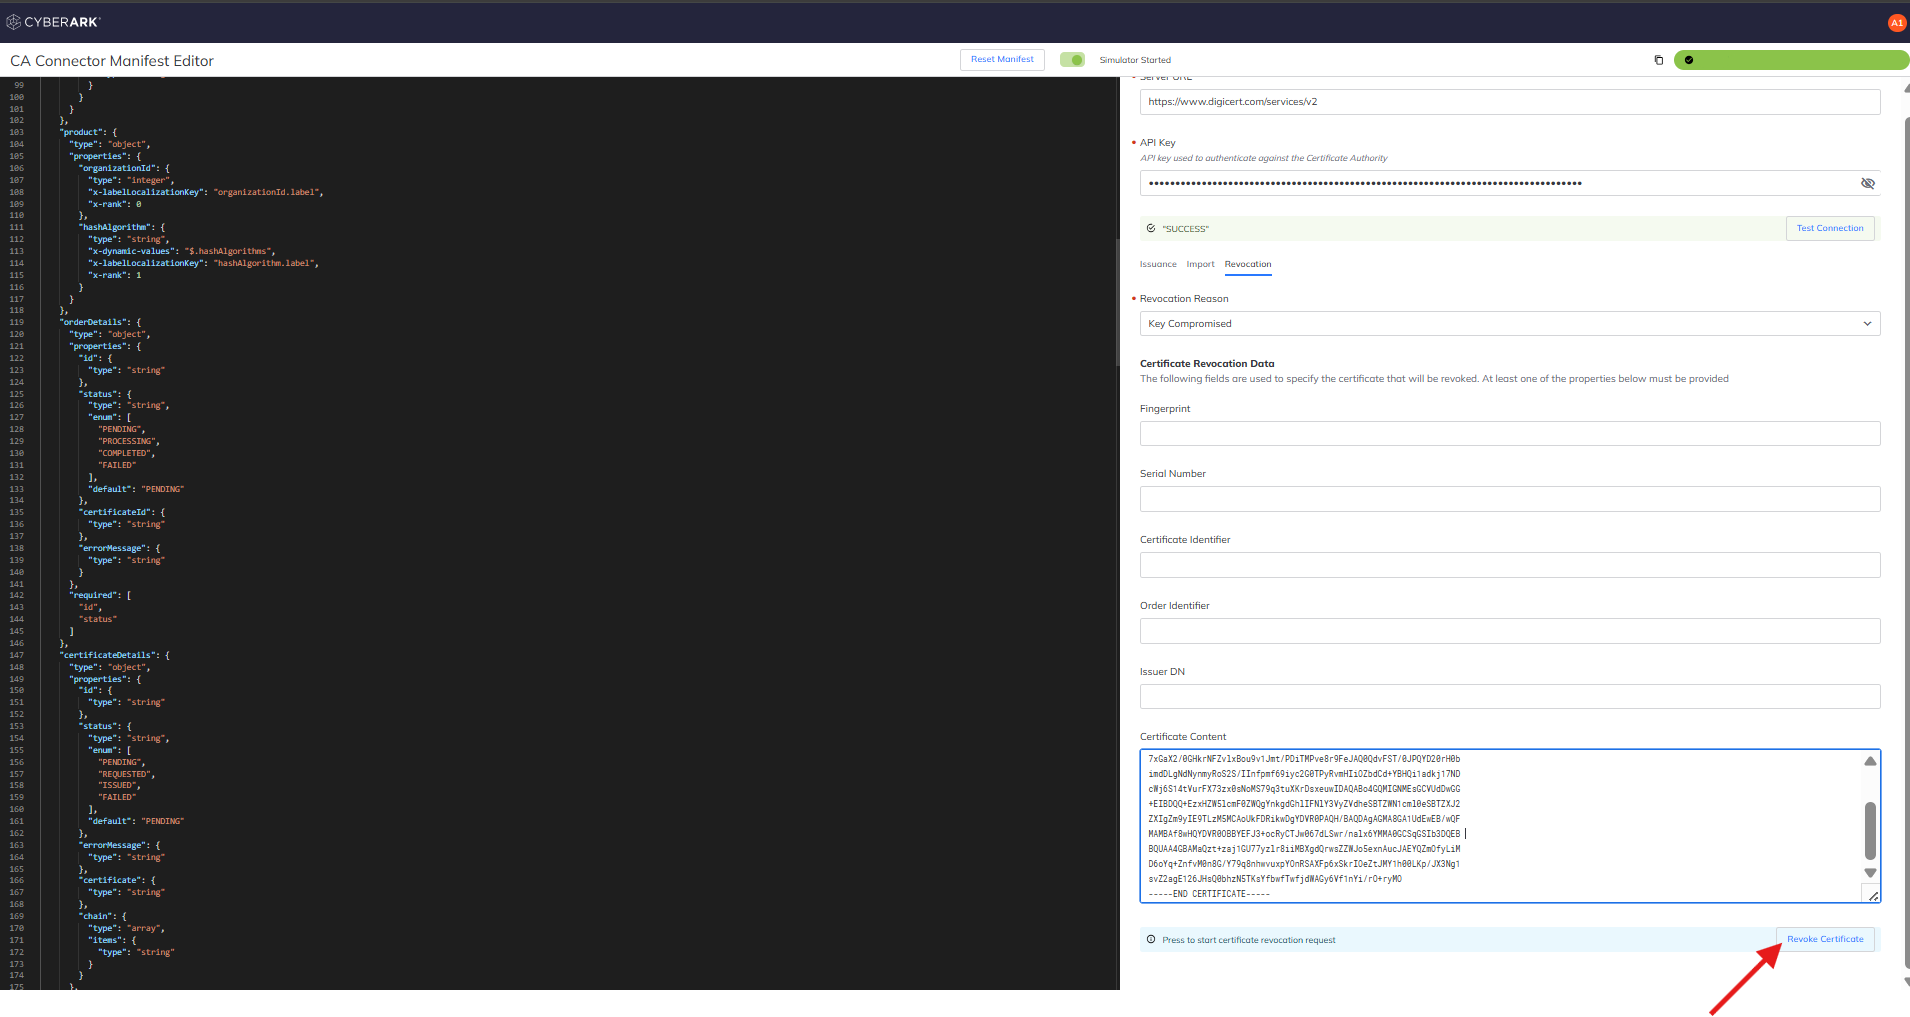
- Revoke your certificate. In addition to the issuance and import capabilities, revoking certificates is also possible. Fill out the required fields and click the "Revoke Certificate" button. You should see a successful revocation or an error that prevents the certificate revocation.
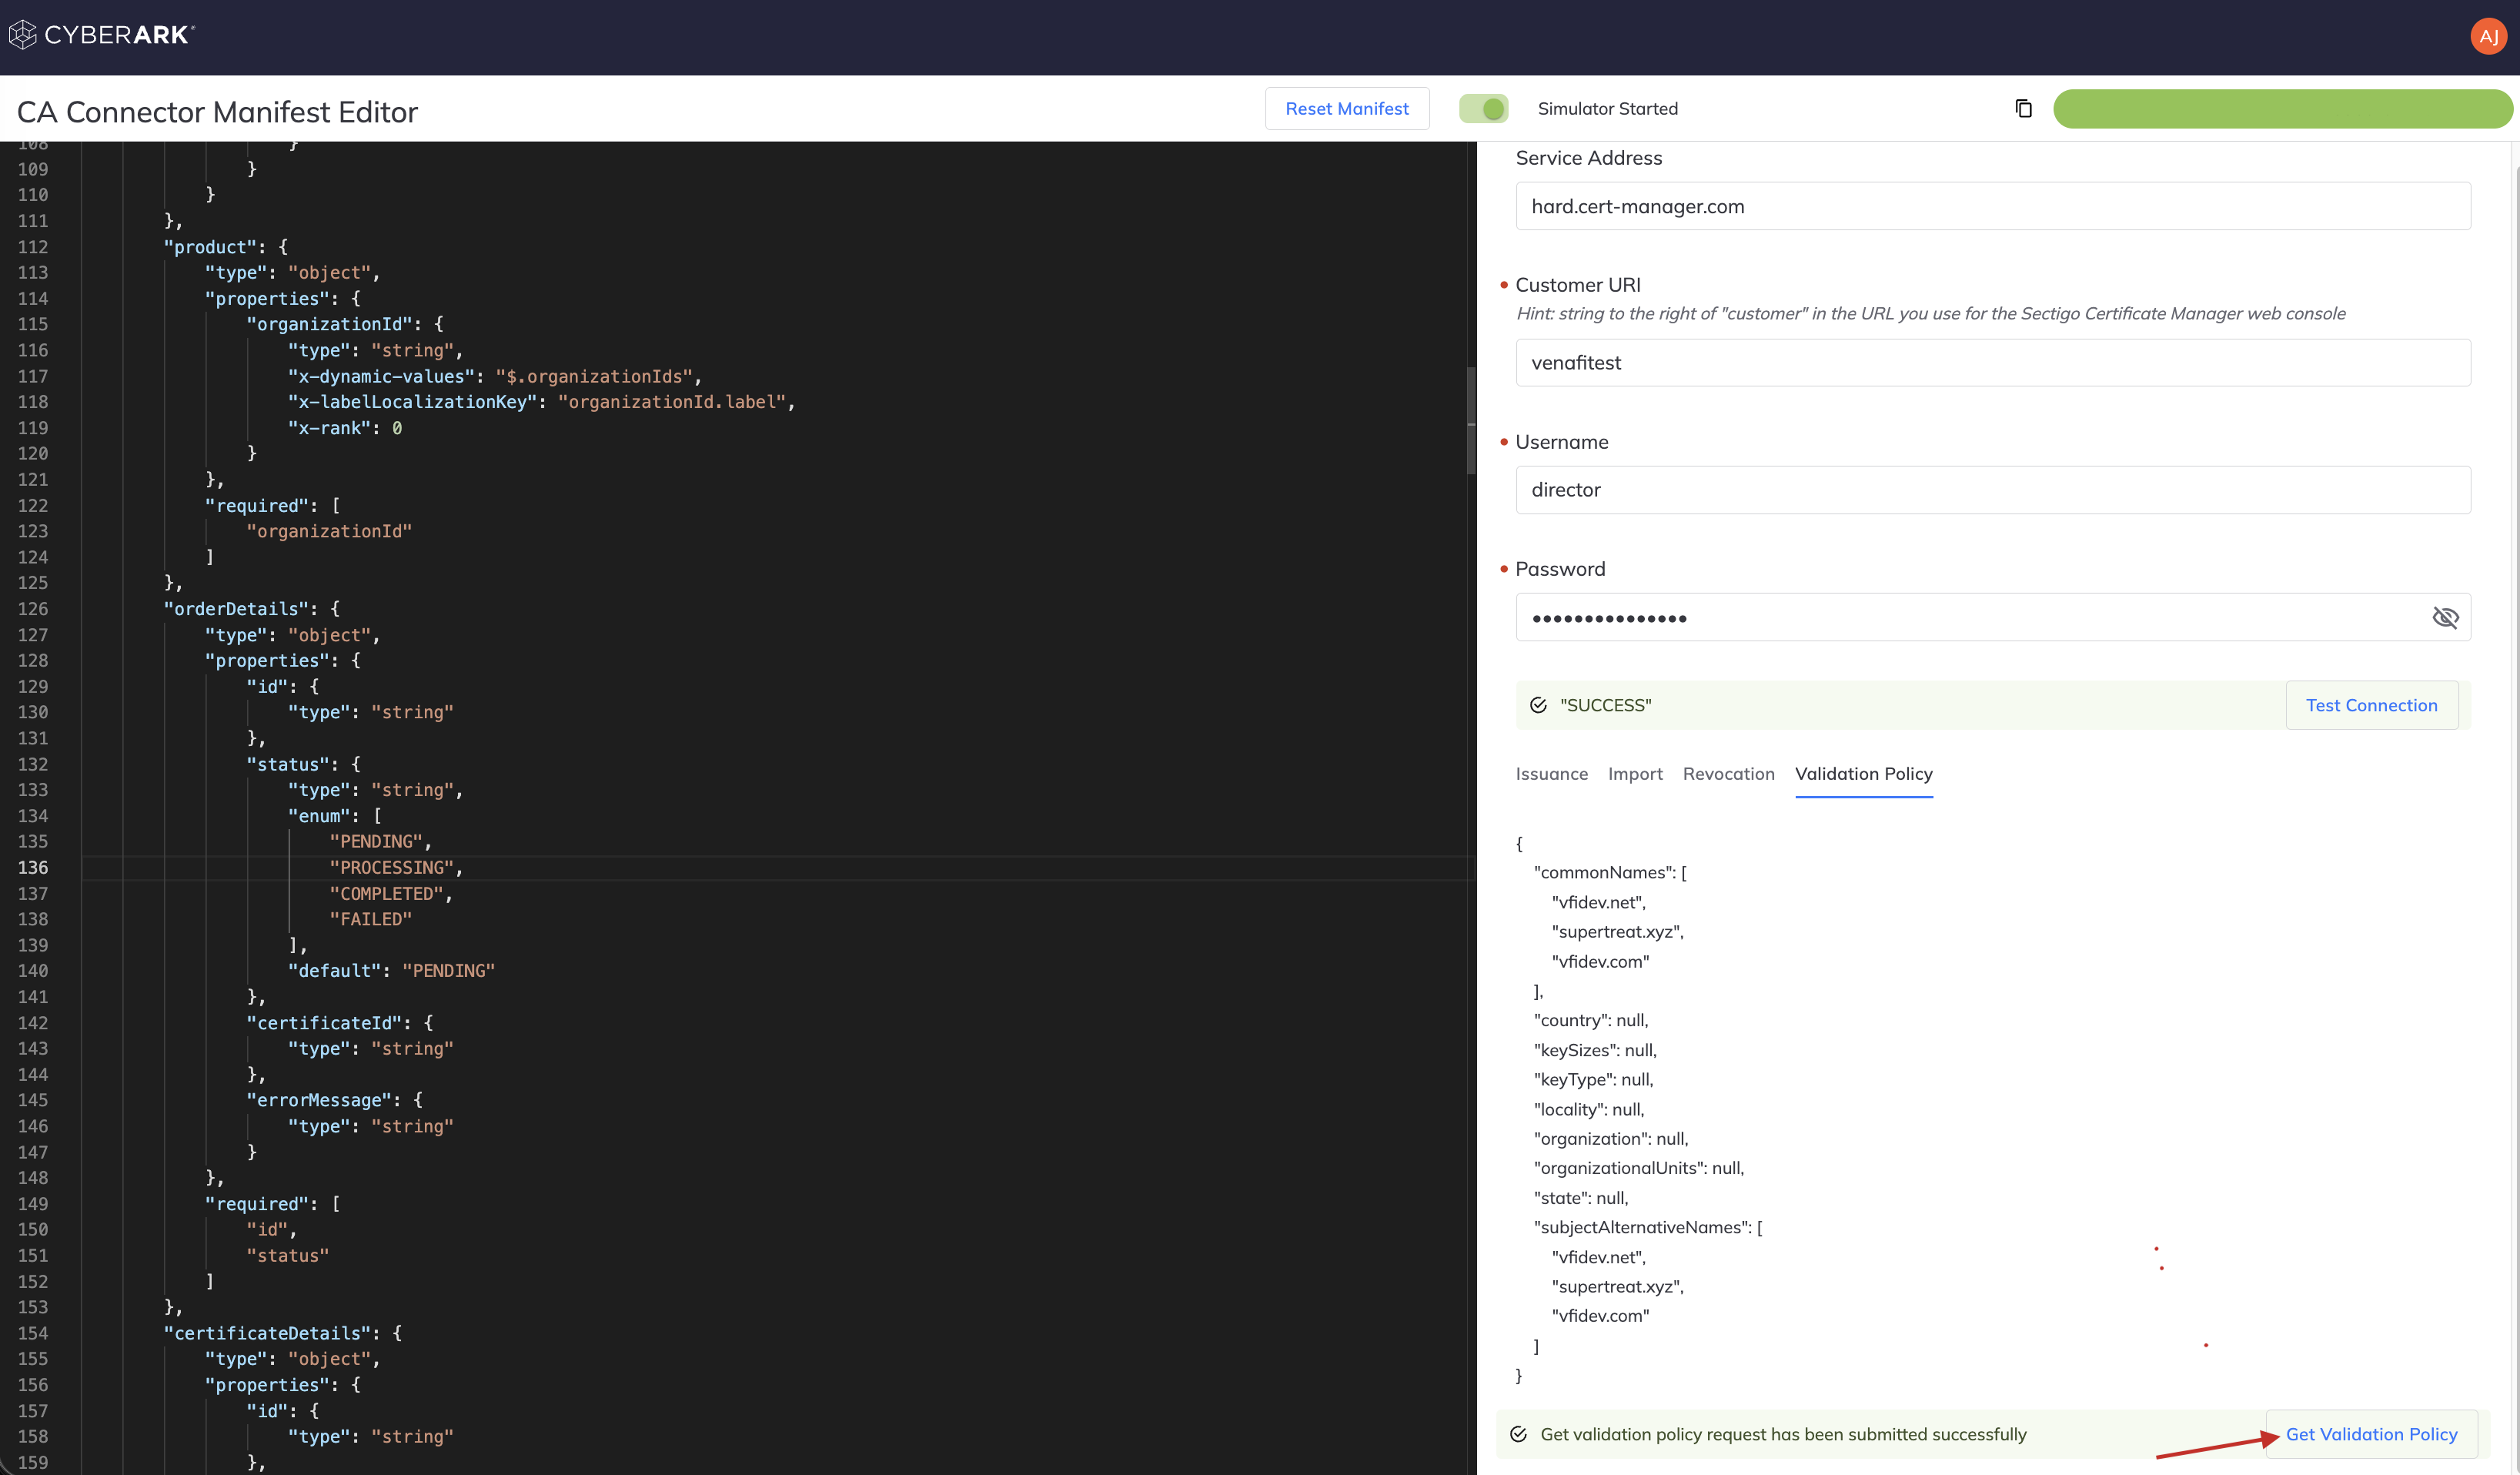
- Retrieve validation policy. Retrieving CA validation policy is also possible. This capability is used to get the allowed domains from the CA and prepopulate the Common Name and DNS SAN values when creating an issuing template. Fill out the required fields and click Get Validation Policy. You should see the current CA validation policy including name constraints or an error that prevents the policy retrieval.
🥇 Congrats, you have built your own CA connector! Now that you have completed this, do you want to take the next step and learn about our CA Connector program?
CA Connector program for Certificate Manager, SaaS
See the below to develop your connector alongside Cyberark. This will ensure a fast publication of your CA connector!
📘 Note
The CA connector program for Certificate Manager, SaaS is evolving, so some specifics about the following requirements are subject to change.
-
Develop (Developer owned) - Develop CA connector using included resources.
-
Test (Developer owned) – Test the CA connector code and validate the required application functions.
-
Submit (Developer owned) – Submit the CA connector code to CyberArk.
-
Certify (CyberArk owned) - CyberArk will certify the CA connector and provide any feedback.
-
Publish to production (CyberArk owned) – CyberArk will publish the CA connector to production.
Submit Your Solution
Once your CA connector has been built and tested internally by your team, you are now ready to submit your solution to CyberArk for certification! We ask that you submit any accompanying documentation and a short video demo walking through each supported function of your solution.
Manifest reference
The manifest is a JSON document with a defined structure and required nodes that specifies how data will be exchanged between users and your connector. The manifest is required to deploy and use your CA connector in Certificate Manager, SaaS.
Your manifest should contain the following information:
📘 Info
The following property key names cannot be modified. However, you can add new property keys/values and edit as needed.
Manifest Reference
The top layer property
| Property name | Type | Required /Optional | Description |
|---|---|---|---|
| name | string | Required | Name of the new connector. Displayed in the UI. |
| description | string | Optional | Description of your machine. Currently not displayed in the UI. |
| pluginType | string | Required | The value must always be "CA" for CA connectors. |
| workTypes | array | Required | Supported work types for the CA connector. "CERTIFICATE_IMPORT", "ISSUANCE", and "CERTIFICATE_IMPORT" and "ISSUANCE". |
| deployment | object | Required | List the location of your image/binary. |
| executionTarget | string | Required | Value must always be "vsat" since VSatellites are the supported execution environment for CA connectors. |
| image | string | Required | The location of the final product (e.g., binary). The location of where the system can send the image to the VSatellite, in order to download and run it. |
The following is an example of this section of the manifest:
  "name": "My Certificate Authority",
  "description": "Connector for issuing and importing certificates from my CA",
  "pluginType": "CA",
  "workTypes": [
    "CERTIFICATE_IMPORT",
    "ISSUANCE"
  ],
  "deployment": {
    "executionTarget": "vsat",
    "image": "docker.io/hello-connector:latest",
  },
  "domainSchema": ...
📘 Info
The domainSchema is the container object that holds the connection, productOption, product, orderDetails, certificateDetails, importOption, importConfiguration, localizationResources, and hooks object definitions.
The connection property
| Property name | Type | Required /Optional | Description |
|---|---|---|---|
| type | object | Required | The value must always be "object". |
| properties | object | Required | Connection details needed for verifying the connection to the Certificate Authority server. Valid properties are "configuration" and "credentials" |
| configuration | object | Required | Describes the desired input configuration controls(defined by the developer) that are displayed in the UI. For example, "Server URL", "Port", etc. |
| credentials | object | Required | Describes the desired input credential controls(defined by the developer) that are displayed in the UI. For example, "API Key", "Username", "Password", "Client Certificate", etc. |
| description | string | Optional | Description for the specific property and displays helper text (hints) in the UI. |
| x-encrypted | boolean | Optional | Encrypts the data sent from the browser UI session to the cloud. The encrypted data can only be decrypted by a vSatellite. Recommended for sensitive data such as credentials properties for example. |
| x-labelLocalizationKey | string | Required | The key/value used to identify the text shown in the UI. The value is the path to the localization text for each language defined in the localization resources. The value is a dotted path, for example, "serverUrl.label". |
| x-rank | integer | Optional | Determines the rank order in the UI. The value is used to force layout/ordering. |
| x-controlOptions | object | Optional | Contains specific options used to enhance the UI layout. |
| password | boolean | Optional (within "x-controlOptions") | Provides the option to hide or show password text. When the value is set to "true," the UI will not display the typed text. |
| showPasswordLabel | string | Optional | Displays additional input icons to show or hide the password. A part of the “x-controlOptions” definition and required when the corresponding “password” field is true. |
| hidePasswordLabel | string | Optional | Displays the hover text for the password. A part of the “x-controlOptions” definition and required when the corresponding “password” field is true. |
| fileUpload | boolean | Optional (within "x-controlOptions") | When the value is set to "true", UI will provide an option to upload a file and content of the file will be assigned to the specific property value. For example, client certificate used for authentication. |
| encoded | string | Optional | A part of the “x-controlOptions” definition and effective when the corresponding “fileUpload” field is true. When enabled, data from the uploaded file will be additionally base 64 encoded. |
| required | array | Optional | The UI uses these names to identify required input fields. If present, the strings listed must match the "properties" named fields. |
The followings are examples of this section of the manifest:
{
  "connection": {
    "type": "object",
    "properties": {
      "configuration": {
        "type": "object",
        "properties": {
          "serverUrl": {
            "type": "string",
            "x-labelLocalizationKey": "serverUrl.label",
            "x-rank": 0
          }
        },
        "required": [
          "serverUrl"
        ]
      },
      "credentials": {
        "type": "object",
        "properties": {
          "apiKey": {
            "type": "string",
            "description": "apiKey.description",
            "x-encrypted": true,
            "x-labelLocalizationKey": "apiKey.label",
            "x-rank": 1,
            "x-controlOptions": {
              "password": "true",
              "hidePasswordLabel": "password.hidePassword",
              "showPasswordLabel": "password.showPassword"
            }
          }
        },
        "required": [
          "apiKey"
        ]
      }
    },
    "required": [
      "configuration",
      "credentials"
    ]
  }
}
The productOption property
It is common for CAs to offer "products", "profiles", or "templates" that bundle together several attributes to make it easier to request a certificate and manage entitlements. In the CA Connector Framework, Product Options are used to represent these bundles and Product Details are used to capture settings that specifically pertain to an individual Product Option. At least one Product Option is required so for CAs where they would be otherwise unnecessary, naming it "Default Product" is recommended.
| Property name | Type | Required /Optional | Description |
|---|---|---|---|
| type | object | Required | The value must always be "object". |
| properties | object | Required | Describes product (issuance) option properties. Valid properties are "name", "types", and "productDetails". |
| name | string | Required | Name of the product option displayed in the UI. |
| types | array | Required | Types of the product option. Supported values are ["SSL"], ["CODE_SIGN"], and ["SSL", "CODE_SIGN"]. |
| productDetails | object | Optional | Describes specific product details (as defined by the developer) for that product option that will be displayed in the UI. |
| required | array | Required | The UI uses these names to identify required input fields. If present, the strings listed must match the "properties" named fields. |
The following is an example of this section of the manifest (only the "productDetails" section should be customized):
 {
  "productOption": {
    "type": "object",
    "properties": {
      "name": {
        "type": "string"
      },
      "types": {
        "type": "array",
        "items": {
          "type": "string",
          "enum": [
            "SSL",
            "CODE_SIGN"
          ],
          "default": "SSL"
        }
      },
      "productDetails": {
        "type": "objects",
        "properties": {
          "hashAlgorithms": {
            "type": "array",
            "items": {
              "type": "string"
            }
          },
          "certificateType": {
            "type": "string"
          },
          "allowAutoRenew": {
            "type": "boolean"
          },
          "organizationIds": {
            "type": "array",
            "items": {
              "type": "integer"
            }
          }
        }
      }
    },
    "required": [
      "name",
      "types"
    ]
  }
}
The product property
Product properties have a very close relationship to Product Details. Whereas Product Details allow the connector to capture settings applicable to a specific certificate product, Products represent input that must be collected from a user. Product Details may identify the values that are allowed for a corresponding Product.
| Property name | Type | Required /Optional | Description |
|---|---|---|---|
| type | object | Required | The value must always be "object". |
| properties | object | Required | Describes the desired input controls (defined by the developer) displayed in the UI. |
| x-dynamic-values | schema ref | Optional | Reference to a set of (productDetail) values that can be assigned to the property (i.e., choices from which a UI user may select). Only valid for properties of string type. |
| x-labelLocalizationKey | string | Required | The key/value used to identify the text shown in the UI. The value is the path to the localization text for each language defined in the localization resources. The value is a dotted path, for example, "hashAlgorithm.label". |
| x-rank | integer | Optional | Determines the rank order in the UI. The value is used to force layout/ordering. |
| required | array | Optional | The UI uses these names to identify required input fields. If present, the strings listed must match the "properties" named fields. |
The following is an example of this section of the manifest:
 {
  "product": {
    "type": "object",
    "properties": {
      "organizationId": {
        "type": "integer",
        "x-labelLocalizationKey": "organizationId.label",
        "x-rank": 0
      },
      "hashAlgorithm": {
        "type": "string",
        "x-dynamic-values": "$.productDetails.hashAlgorithms",
        "x-labelLocalizationKey": "hashAlgorithm.label",
        "x-rank": 1
      },
      "nameId": {
        "type": "string",
        "x-labelLocalizationKey": "nameId.label",
        "x-rank": 2
      }
    }
  }
}
The orderDetails property
Some CAs differentiate between certificate requests and issued certificates, whereas others use a single object. For the case where they are distinct, the CA Connector Framework provides Order Details for the certificate requests and Certificate Details for the certificates. Order Details indicate the status of the request and identify the certificate to download. Order Details don't apply if certificate requests and issued certificates are represented by a single object. For such cases, naming the Import Option "Default Product" or "All Products" is recommended.
| Property name | Type | Required /Optional | Description |
|---|---|---|---|
| type | object | Required | The value must always be "object". |
| properties | object | Required | Describes relevant order details for a submitted certificate request. Valid properties are "id", "status", "certificateId", and "errorMessage". |
| id | string | Required | Identifier for submitted certificate request order. |
| status | string | Required | Status of the order. Possible values are - PENDING", "PROCESSING", "COMPLETED", and "FAILED". |
| certificateId | string | Optional | Identifier of the issued certificate. Usually available when the order is completed, and we can start checking for the certificate using that certificate id. |
| errorMessage | string | Optional | Contains a detailed error message in the event of a FAILED order status for the submitted certificate signing request. |
| required | array | Required | Describes required properties for order details - "id" and "status" must always be present. |
The following shows how this section must appear in the manifest:
 {
  "orderDetails": {
    "type": "object",
    "properties": {
      "id": {
        "type": "string"
      },
      "status": {
        "type": "string",
        "enum": [
          "PENDING",
          "PROCESSING",
          "COMPLETED",
          "FAILED"
        ],
        "default": "PENDING"
      },
      "certificateId": {
        "type": "string"
      },
      "errorMessage": {
        "type": "string"
      }
    },
    "required": [
      "id",
      "status"
    ]
  }
}
The certificateDetails property
Certificate Details are similar to Order Details in that they indicate the status of a requested certificate but differ in that they're used to communicate the actual X.509 certificate and applicable chain certificates once a certificate has been issued.
| Property name | Type | Required /Optional | Description |
|---|---|---|---|
| type | object | Required | The value must always be "object". |
| properties | object | Required | Describes relevant certificate details for a submitted certificate request. Valid properties are "id", "status", "certificate", "chain", and "errorMessage". |
| id | string | Required | Certificate identifier for submitted certificate request. |
| status | string | Required | Status of certificate signing request. Possible values are - "PENDING", "REQUESTED", "ISSUED", "FAILED". |
| certificate | string | Optional | Issued certificate represented in pem format without header and footer, i.e base 64 encoded DER. Available, once status is updated to ISSUED. |
| chain | array | Optional | Array holding issuer certificates represented in pem format without header and footer, i.e base 64 encoded DER. Available, once status is updated to ISSUED. |
| errorMessage | string | Optional | Detailed error message in case of FAILED status for submitted certificate signing request. |
| required | array | Required | Describes required properties for order details - "id" and "status" must always be present. |
The following shows how this section must appear in the manifest:
 {
  "certificateDetails": {
    "type": "object",
    "properties": {
      "id": {
        "type": "string"
      },
      "status": {
        "type": "string",
        "enum": [
          "PENDING",
          "REQUESTED",
          "ISSUED",
          "FAILED"
        ],
        "default": "PENDING"
      },
      "errorMessage": {
        "type": "string"
      },
      "certificate": {
        "type": "string"
      },
      "chain": {
        "type": "array",
        "items": {
          "type": "string"
        }
      }
    },
    "required": [
      "id",
      "status"
    ]
  }
}
The importOption property
Import Options are very similar to Product Options except that they apply to what the CA connector will import rather than what type of certificate it will request. It's not uncommon for Import Options and Product Options to be the same but when CAs don't support filtering by a product, profile, or template, Import Options aren't needed but at least one is required if the CA connector supports importing certificates.
| Property name | Type | Required /Optional | Description |
|---|---|---|---|
| type | object | Required | The value must always be "object". |
| properties | object | Required | Describes product (issuance) option properties. Valid properties are "name", "types", and "productDetails". |
| name | string | Required | Name of the product option displayed in the UI. |
| description | array | Optional | Description of the import option displayed in the UI. |
| settings | object | Optional | Describes specific settings (as defined by the developer) for that import option. |
| required | array | Required | The UI uses these names to identify required input fields. If present, the strings listed must match the "properties" named fields. |
The following is an example of this section of the manifest (only the "settings" section should be customized):
 {
  "importOption": {
    "type": "object",
    "properties": {
      "name": {
        "type": "string"
      },
      "description": {
        "type": "string"
      },
      "settings": {
        "type": "objects",
        "properties": {
          "nameId": {
            "type": "string"
          },
          "organizationId": {
            "type": "integer"
          }
        }
      }
    },
    "required": [
      "name"
    ]
  }
}
The importConfiguration property
The Import Configuration allows you to define other properties for the connector to consider when performing an import. The choices to include expired or revoked certificates are most common.
| Property name | Type | Required /Optional | Description |
|---|---|---|---|
| type | object | Required | The value must always be "object". |
| properties | object | Required | Describes import configuration properties. |
The following is an example of this section of the manifest:
 {
  "importConfiguration": {
    "type": "object",
    "properties": {
      "includeRevokedCertificates": {
        "type": "boolean",
        "x-labelLocalizationKey": "",
        "x-controlOptions": {
          "toggledLabel": "includeRevokedCertificates.label",
          "untoggledLabel": "includeRevokedCertificates.label"
        },
        "x-rank": 0
      },
      "includeExpiredCertificates": {
        "type": "boolean",
        "x-labelLocalizationKey": "",
        "x-controlOptions": {
          "toggledLabel": "includeExpiredCertificates.label",
          "untoggledLabel": "includeExpiredCertificates.label"
        },
        "x-rank": 1
      }
    }
  }
}
The certificateRevocationData property
The Certificate Revocation Data
| Property name | Type | Required /Optional | Description |
|---|---|---|---|
| type | object | Required | The value must always be "object". |
| properties | object | Required | At least one of the listed properties must be present. |
The following is an example of this section of the manifest:
 {
   "certificateRevocationData": {
      "type": "object",
      "properties": {
         "serialNumber": {
            "type": "string"
         },
         "caCertificateIdentifier": {
            "type": "string"
         },
         "caOrderIdentifier": {
            "type": "string"
         },
         "fingerprint": {
            "type": "string"
         },
         "issuerDN": {
            "type": "string"
         },
         "certificateContent": {
            "type": "string"
         }
      },
      "anyOf": [
         { "required": ["serialNumber"] },
         { "required": ["caCertificateIdentifier"] },
         { "required": ["caOrderIdentifier"] },
         { "required": ["fingerprint"] },
         { "required": ["issuerDN"] },
         { "required": ["certificateContent"] }
      ]
  }
}
The localizationResources property
There are no required properties that need to exist in localizationResources property section. However, for developer defined data related to connection, product and importConfiguration, if x-labelLocalizationKey is defined in the manifest, appropriate label properties need to be added here also.
| Property name | Type | Required /Optional | Description |
|---|---|---|---|
| localizationResources | object | Optional | An object containing one or more named language references. |
| en | object | required | En is a language code which refers to the English language. |
The following is an example of this section of the manifest:
{
  "localizationResources": {
    "en": {
      "serverUrl": {
        "label": "Server URL"
      },
      "apiKey": {
        "label": "API Key",
        "description": "API key used to authenticate against the Certificate Authority"
      },
      "organizationId": {
        "label": "Organizations"
      },
      "hashAlgorithm": {
        "label": "Signature Hash"
      },
      "nameId": {
        "label": "Name ID"
      },
      "autoRenew": {
        "label": "Allow Auto Renew"
      }
    }
  }
}
The hooks property
| Property name | Type | Required /Optional | Description |
|---|---|---|---|
| hooks | object | Required | |
| mapping | object | Required | An object of key value pairs for the CA connector supported activity names. |
| testConnection | string | Required | URL path used when sending a POST to the connector for testing connectivity between that connector and the target CA. |
| getOptions | string | Required | URL path used when sending a POST to the connector for retrieving product (issuance) and import options from the target CA. |
| validateProduct | string | Required | URL path used when sending a POST to the connector for validating product (issuance) details with the target CA. |
| requestCertificate | string | Required | URL path used when sending a POST to the connector for the signing of a certificate request by the target CA. |
| checkOrder | string | Optional | URL path used when sending a POST to the connector to check with the target CA for order status/details of a previously submitted certificate request. |
| checkCertificate | string | Required | URL path used when sending a POST to the connector to check with the target CA for certificate status and retrieving the issued certificate corresponding to a previously submitted certificate request. |
| importCertificates | string | Optional | URL path used when sending a POST to the connector for retrieving previously issued certificates from CA for importing into the system. |
| revokeCertificate | string | Optional | URL path used when sending a POST to the connector for revoke a certificate by the target CA. |
| getValidationPolicy | string | Optional | URL path used when sending a POST to the connector for retrieving the current CA validation policy, including name constraints for Common Name and DNS SAN patterns. |
| The hooks section of the manifest can be found below. This describes the URL path and exact contract (request and response object representation) for each hook mapping, ensuring that developers are aware of what to expect and follow that contract when developing a new CA connector. |
{
  "hooks": {
    "mapping": {
      "testConnection": {
        "path": "/v1/testconnection",
        "request": {
          "type": "object",
          "properties": {
            "connection": {
              "$ref": "#/domainSchema/connection"
            }
          }
        },
        "response": {
          "type": "object",
          "properties": {
            "result": {
              "type": "string",
              "enum": [
                "SUCCESS",
                "FAILED"
              ],
              "default": "FAILED"
            },
            "message": {
              "type": "string"
            }
          },
          "required": [
            "result"
          ]
        }
      },
      "getOptions": {
        "path": "/v1/getoptions",
        "request": {
          "type": "object",
          "properties": {
            "connection": {
              "$ref": "#/domainSchema/connection"
            }
          }
        },
        "response": {
          "type": "object",
          "properties": {
            "productOptions": {
              "type": "array",
              "items": {
                "$ref": "#/domainSchema/productOption"
              }
            }
          }
        }
      },
      "requestCertificate": {
        "path": "/v1/requestcertificate",
        "request": {
          "type": "object",
          "properties": {
            "connection": {
              "$ref": "#/domainSchema/connection"
            },
            "validitySeconds": {
              "type": "int"
            },
            "productOptionName": {
              "type": "string"
            },
            "product": {
              "$ref": "#/domainSchema/product"
            },
            "pkcs10Request": {
              "type": "string"
            }
          }
        },
        "response": {
          "type": "object",
          "properties": {
            "orderDetails": {
              "$ref": "#/domainSchema/orderDetails"
            },
            "certificateDetails": {
              "$ref": "#/domainSchema/certificateDetails"
            }
          }
        }
      },
      "checkOrder": {
        "path": "/v1/checkorder",
        "request": {
          "type": "object",
          "properties": {
            "connection": {
              "$ref": "#/domainSchema/connection"
            },
            "id": {
              "type": "string"
            }
          }
        },
        "response": {
          "$ref": "#/domainSchema/orderDetails"
        }
      },
      "checkCertificate": {
        "path": "/v1/checkcertificate",
        "request": {
          "type": "object",
          "properties": {
            "connection": {
              "$ref": "#/domainSchema/connection"
            },
            "id": {
              "type": "string"
            }
          }
        },
        "response": {
          "$ref": "#/domainSchema/certificateDetails"
        }
      },
      "validateProduct": {
        "path": "/v1/validateproduct",
        "request": {
          "type": "object",
          "properties": {
            "connection": {
              "$ref": "#/domainSchema/connection"
            },
            "name": {
              "type": "string"
            },
            "product": {
              "$ref": "#/domainSchema/product"
            }
          }
        },
        "response": {
          "type": "object",
          "properties": {
            "errors": {
              "type": "array",
              "items": {
                "type": "object",
                "properties": {
                  "attributeName": {
                    "type": "string"
                  },
                  "attributeValue": {
                    "type": "string"
                  }
                }
              }
            }
          }
        }
      },
      "importCertificates": {
        "path": "/v1/importcertificates",
        "request": {
          "type": "object",
          "properties": {
            "connection": {
              "$ref": "#/domainSchema/connection"
            },
            "option": {
              "$ref": "#/domainSchema/importOption"
            },
            "configuration": {
              "$ref": "#/domainSchema/importConfiguration"
            },
            "lastProcessedCertificateId": {
              "type": "string",
              "default": "0"
            },
            "batchSize": {
              "type": "int"
            }
          }
        },
        "response": {
          "type": "object",
          "properties": {
            "status": {
              "type": "string",
              "enum": [
                "UNCOMPLETED",
                "COMPLETED"
              ]
            },
            "lastProcessedCertificateId": {
              "type": "string"
            },
            "certificates": {
              "type": "array",
              "items": {
                "type": "object",
                "properties": {
                  "id": {
                    "type": "string"
                  },
                  "certificate": {
                    "type": "string"
                  },
                  "chain": {
                    "type": "array",
                    "items": {
                      "type": "string"
                    }
                  }
                },
                "required": [
                  "certificate"
                ]
              }
            }
          },
          "required": [
            "status",
            "lastProcessedCertificateId"
          ]
        }
      },
      "revokeCertificate": {
        "path": "/v1/revokecertificate",
        "request": {
          "type": "object",
          "properties": {
            "connection": {
              "$ref": "#/domainSchema/connection"
            },
            "certificateRevocationData": {
              "$ref": "#/domainSchema/certificateRevocationData"
            },
            "reason": {
              "type": "int",
              "maximum": 10,
              "minimum": 0
            }
          },
          "required": [
            "connection",
            "certificateRevocationData",
            "reason"
          ]
        },
        "response": {
          "type": "object",
          "properties": {
            "revocationStatus": {
              "type": "string",
              "enum": [
                "SUBMITTED",
                "FAILED"
              ]
            },
            "errorMessage": {
              "type": "string"
            }
          },
          "required": [
            "revocationStatus"
          ]
        }
      },
       "getValidationPolicy": {
          "path": "/v1/getvalidationpolicy",
          "request": {
             "type": "object",
             "properties": {
                "connection": {
                   "$ref": "#/domainSchema/connection"
                }
             },
             "required": [
                "connection"
             ]
          },
          "response": {
             "type": "object",
             "properties": {
                "commonNames": {
                   "type": "array",
                   "items": {
                      "type": "string"
                   }
                },
                "subjectAlternativeNames": {
                   "type": "array",
                   "items": {
                      "type": "string"
                   }
                },
                "country": {
                   "type": "string"
                },
                "state": {
                   "type": "string"
                },
                "locality": {
                   "type": "string"
                },
                "organization": {
                   "type": "string"
                },
                "organizationalUnits": {
                   "type": "array",
                   "items": {
                      "type": "string"
                   }
                },
                "keySizes": {
                   "type": "array",
                   "items": {
                      "type": "int"
                   }
                },
                "keyType": {
                   "type": "string"
                }
             }
          }
       }
    }
  }
}
Data flow for requesting a certificate
Here is a sample of a request to /v1/requestcertificate for signing a CSR:
{
   "connection": {
      "configuration": {
         "serverUrl": "ca-server-url.com"
      },
      "credentials": {
         "apiKey": "XXXXXXXXXXXXXXXX"
      }
   },
   "validitySeconds": 31536000,
   "productOptionName": "Private SSL",
   "product": {
      "organizationId": 323576,
      "hashAlgorithm": "sha256",
      "nameId": "private_ssl_plus"
   },
   "pkcs10Request":"-----BEGIN CERTIFICATE REQUEST-----\n..... \n-----END CERTIFICATE REQUEST-----"
}
The response differs based on the way certificates are issued by the CA:
-
If certificate requests are signed by the CA syncronously, the response should include the issued certificate and issuer (chain) certificates as shown below:
{
  "certificateDetails": {
    "certificate": "Base64 encoded DER issued certificate bytes (PEM representation without header and footer)",
    "chain": [
      "Base64 encoded DER intermediate issuer certificate bytes (PEM representation without header and footer)",
      "Base64 encoded DER root CA certificate bytes (PEM representation without header and footer)"
    ],
    "errorMessage": "",
    "id": "564988997",
    "status": "ISSUED"
  },
  "orderDetails": null
} -
If certificate request signing happens asyncronously (which means the signing operation is expected to take longer) and the CA returns an ID for the request that is the same as the ID it will use for the issued certificate, the response should only include the certificate ID with a status of "REQUESTED" as shown below:
{
  "certificateDetails": {
    "certificate": "",
    "chain": null,
    "errorMessage": "",
    "id": "564988997",
    "status": "REQUESTED"
  },
  "orderDetails": null
}
As long as certificate ID is returned as part of the certificateDetails and the status is not final (ISSUED or FAILED), calls are made to
/v1/checkcertificatewith a payload similar to the following until the response includes a certificate or the status is "FAILED":{
"connection": {
"configuration": {
"serverUrl": "ca-server-url.com"
},
"credentials": {
"apiKey": "XXXXXXXXXXXXXXXX"
}
},
"id": "564988997"
}The response from
/v1/checkcertificatewhen it contains an issued certificate looks similar to this:{
"certificateDetails": {
"certificate": "Base64 encoded DER issued certificate bytes (PEM representation without header and footer)",
"chain": [
"Base64 encoded DER intermediate issuer certificate bytes (PEM representation without header and footer)",
"Base64 encoded DER root CA certificate bytes (PEM representation without header and footer)"
],
"errorMessage": "",
"id": "564988997",
"status": "ISSUED"
}
} -
If signing of the certificate request requires approval or some additional steps on the CA side, and the CA returns an ID for the request that is different from the ID it will use for the issued certificate, the response should include that ID and a status of "PROCESSING" in orderDetails as in the following example:
  {
    "certificateDetails": null,
    "orderDetails": {
      "certificateId": "",
      "errorMessage": "",
      "id": "564988997",
      "status": "PROCESSING"
    }
  }
As long as ID of the order is returned as part of the orderDetails and the status is not final (COMPLETED or FAILED), calls are made to
/v1/checkorderwith a payload similar to the following until the response includes a certificate ID or the status is "FAILED":{
"connection": {
"configuration": {
"serverUrl": "ca-server-url.com"
},
"credentials": {
"apiKey": "XXXXXXXXXXXXXXXX"
}
},
"id": "564988997"
}Response from
/v1/checkordercontaining a certificate ID should look similar to this:{
"orderDetails": {
"certificateId": "564988997",
"errorMessage": "",
"id": "564988997",
"status": "COMPLETED"
}
}Once status is updated to "COMPLETED" and certificateId is not empty, checking begins for certificate details and the data flow described in section 2.