Overview
This guide demonstrates using the vCert5.0 playbook run feature to automate certificate request, installation, and renewal using CyberArk Certificate Manager - SaaS. At the end of this walkthrough, you will:
- Configure Certificate Manager - SaaS to accept certificate requests from vCert
- Configure a vCert playbook configuration file
- Enroll a certificate for the first time
- Configure an after-installation command to restart an application
- Configure renewal settings to force renewals of the certificates
📘 Note This is designed to be an entry-level guide. Pre-requisite skills include the ability to navigate command-line functions and editing YAML configuration files.
Before you begin
Ensure you have the below prerequisites before starting this procedure.
- An active instance of Certificate Manager - SaaS
- A free 30-day trial account may be requested at: https://venafi.com/try-venafi/try-venafi/
- A Linux-based client system where a basic NGINX web server may be installed and configured
- Ubuntu 22.04
- vCert is available for Linux, Windows, and macOS. However, steps will vary from this guide.
How do I get started?
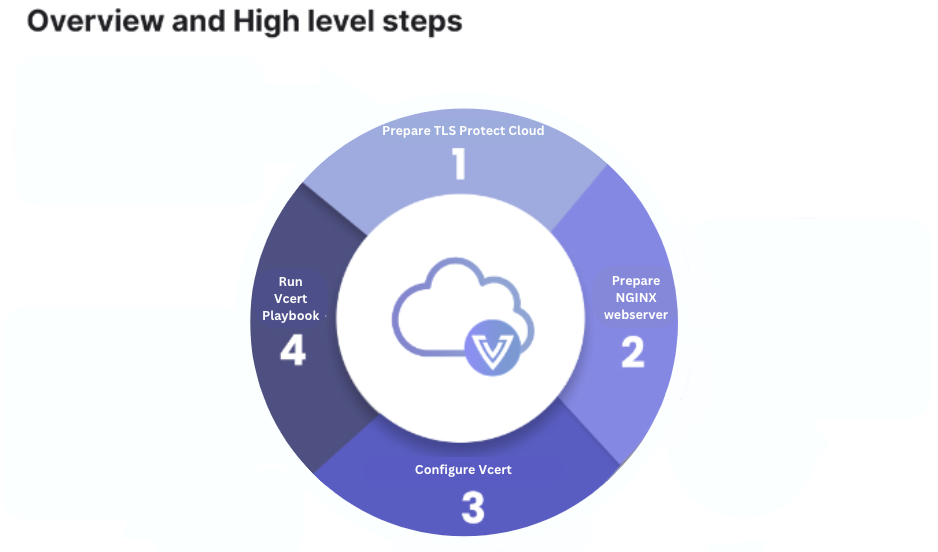
- Prepare Certificate Manager - SaaS - To request a new certificate using vCert, you must first create and configure an application to handle the request. Here we will walk you through creating an application and locating your API key.
- Prepare NGINX web server - We will install and configure the NGINX web server by editing the NGINX configuration file.
- Configure vCert - Download, install, and create a new configuration file for vCert.
- Run the vCert playbook - Here, we will run the vCert playbook and optionally set up test renewal and a scheduled task to ensure it runs on a daily basis.
Step 1: Prepare Certificate Manager - SaaS - Create an application
In Certificate Manager - SaaS, applications serve as a means to organize certificates into logical groupings based on where the certificates are used, and who is responsible for managing them. To request a new certificate using vCert, you must first configure an application to handle the request.
- Log into the Certificate Manager - SaaS at: https://ui.venafi.cloud
- Navigate to Applications in the top-menu, and then select the New button to create a new application.
- Name the application "NGINX vCert Test".
- In the Owners field, enter your details.
- In the Issuing Templates field, select Default.
📘 Note This guide utilizes the Venafi Built-in CA and issuing template provided in each instance of Certificate Manager - SaaS. You can use another CA or issuing template if you have already configured them, or create a new one, following the Issue Certificates topic in the Certificate Manager - SaaS help section at: vaas/certificates/ca/adding-a-certificate-authority/.
Step 2: Locate your current API key
- From Certificate Manager - SaaS, click your avatar in the top-right corner of the menu bar, and then click Preferences.
- Click the
 copy button on the API Keys tab to copy your API key.
For more information on obtaining your API key see: api/obtaining-api-key/
Step 3: Prepare NGINX web server - Install and configure NGINX
- Open or log into your Ubuntu Linux server.
- If you have not already, install NGINX:
- To install using the command-line utility, apt, enter the following commands:
$ sudo apt update
$ sudo apt install nginx
NGINX should now be installed and listening on port 80 for HTTP requests. Choose one of the below methods to confirm:
- Use a web browser with the IP address of your server
- Use the command line
curl http://localhost, and you should see the default HTTP page.
- Edit the NGINX configuration file located at
/etc/nginx/sites-enabled/default:
- Open the file in your preferred editor, using
sudo:
$ sudo vim /etc/nginx/sites-enabled/default
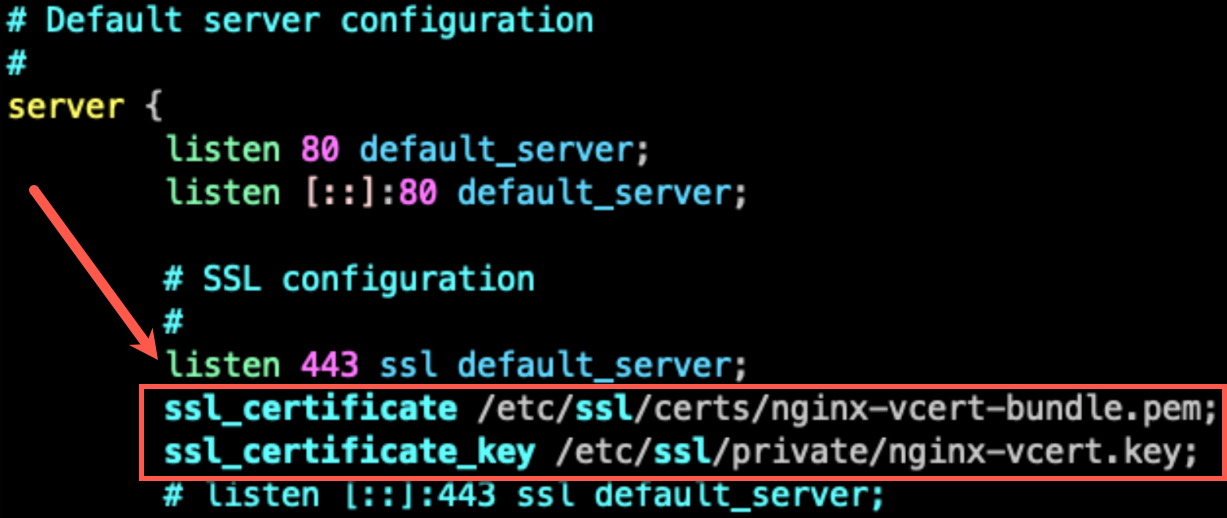
- Uncomment the line that reads
listen 443 ssl default_server - Add the following lines immediately below the line you just uncommented:
ssl_certificate /etc/ssl/certs/nginx-vcert-bundle.pem;
ssl_certificate_key /etc/ssl/private/nginx-vcert.key;
The following section should look similar to the image below:
- Save the changes and then close the file.
📘 Important Do not restart the NGINX web server yet. vCert will do that after getting a certificate.
Step 4: Configure vCert
- Download vCert for Linux from: https://github.com/venafi/vcert/releases. For example:
wget https://github.com/Venafi/vcert/releases/download/v5.3.0/vcert_v5.3.0_linux.zip
- Extract the zip file. You will see the below two files:
- vcert (vCert binary)
- vcert_darwin.sig (signature file)
unzip <vcert-file>
- Copy/install the vcert file to the
/usr/local/bindirectory or into a directory in the users' PATH. - Follow the below steps to create a new YAML configuration file:
- Use vim (or an editor of your choice) to create a configuration file at
~/playbook.yaml. - Copy the following into the new configuration file:
config:
  connection:
    platform: vaas
    credentials:
      apiKey: "xXxxxXXX-xXxX-xXxX-xxxx-xXxxXXxxxXXx"
certificateTasks:
  - name: myCertificate
    renewBefore: 10%
    request:
      zone: "NGINX vCert Test\\Default"
      csr: local
      subject:
        commonName: '{{ Hostname | ToLower }}'
    installations:
    - format: PEM
      afterInstallAction: "cat /etc/ssl/certs/cert.pem /etc/ssl/certs/nginx-vcert-chain.pem > /etc/ssl/certs/nginx-vcert-bundle.pem && systemctl restart nginx"
      file: /etc/ssl/certs/cert.pem
      chainFile: /etc/ssl/certs/nginx-vcert-chain.pem
      keyFile: ../private/nginx-vcert.key
- Update the
apiKeyproperty with the API key retrieved from Certificate Manager - SaaS in the previous steps. - Save and close the file.
Step 5: Run the vCert playbook
- Run
sudo vcert run -f ~/playbook.yaml.
The output should look similar to the the below:
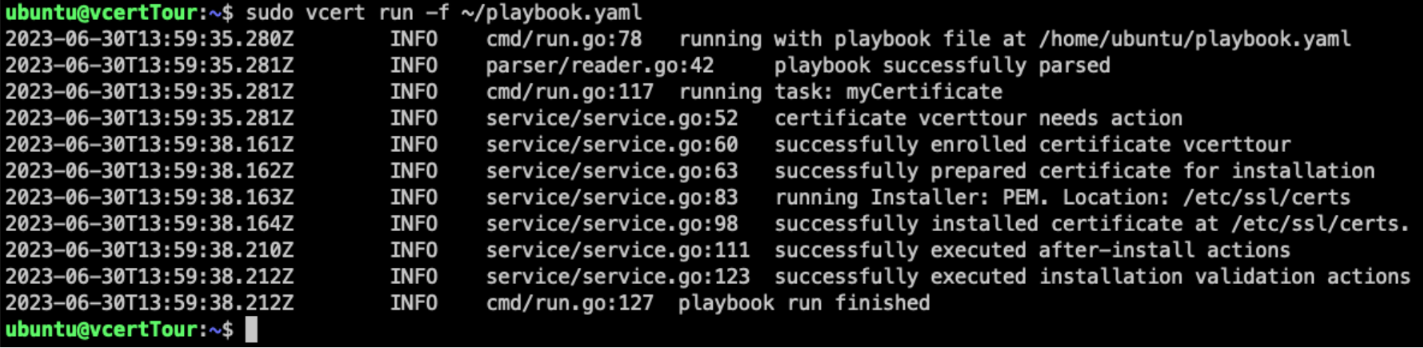
📘 Note Since the certificate does not exist, this first execution of vCert will request and install a new certificate in the specified location. Subsequent executions of vCert will examine the installed certificate and determine if it should be renewed based on the
renewBeforevalue in the playbook configuration file.
- Run
sudo vcert run -f ~/playbook.yamla second time.
The output should look similar to the image below:

📘 Note In the above case, the certificate is not within the timeframe for renewal, so no actions are taken.
- (Optional) Adjust
renewBeforeto test the renewal.
You can edit the parameter for the renewBefore in the file ~/playbook.yaml to cause the renewal to take place by setting the number of days higher than the certificate's validity period. In the case of the default built-in issuer, the certificate is valid for 90 days. Setting this value to 100d will cause renewal to happen on the next run of vCert.
- (Optional) Configure a cronjob to run daily.
In a real-world scenario, setting up a cronjob, scheduled task, or any suitable mechanism to execute the vCert daily is advisable.
- Run
crontab -eto edit the crontab for your user. - Add the following line to the end of the file:
0 23 * * * /usr/bin/sudo /usr/local/bin/vcert run -f ~/playbook.yaml >> /var/log/vcert-user.log 2>&1
📘 Note The above cronjob will run in the context of the currently logged-in user at 11:00 PM every day. This command assumes the user has been configured to run the commands using password-less sudo.
🥇 Congrats, you have now set up automating certificate management using Certificate Manager - SaaS (vCert)!